The voice-data communication in the conference room of MeetingPlaza has the following features:
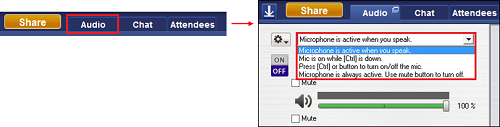
There are multiple talk modes for MeetingPlaza. Let mic to stay activated during speech is called standard mode. User can change it to other modes, such as push to talk mode or enable the mic during all session mode.
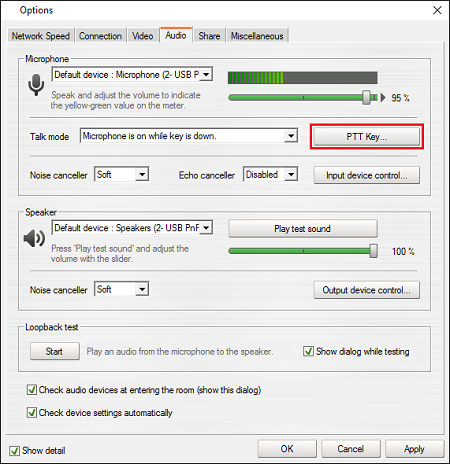
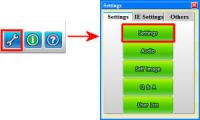
The settings is changed by clicking on the pull down menu in the audio function box.
Standard
Easy, Wide, Discussion, Seminar, V5standard, Classic
Details of setting are as follows. We can use it properly by responding to the use environment etc. because there are a merit and a weak point respectively.
The setting of the talk mode is preserved by the personal computer that uses it, and the same talk mode comes to be used at the next conference.
| Talk mode | Explanation | Advantage | Disadvantage |
|---|---|---|---|
| Microphone is active when you speak. | The sound from the mic, is automatically detected, and transmits the audio | Easy to us if all participant have the correct mic setup. | Feedback from open mics can be distracting. |
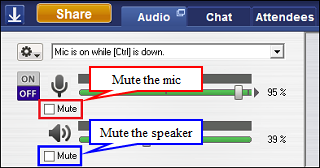
| Mic is on while Ctrl key is down | You can talk by holding down the Ctrl key. | This will eliminate feedback from open mics. | Experience is necessary for this mode. |
| Press Ctrl key to turn on/off the mic | It begins the remark pushing the Ctrl key, it pushes again, and the remark end is done. | The same as "Mic is on while Ctrl key is down". | The same as "Mic is on while Ctrl key is down". |
| Mic is alway on. Use mute button to turn off | All audio is heard. | Used when there is a small number of conference participants. | Open mics can give feedback to the conference |
The Ctrl key is use in the push to talk mode, however one can select a different key for this function
To change the key needed for push to talk click on the down arrow.
(1) Push To Talk (Mic is on while Ctrl key is down)
(2) Assign the key for (Press Ctrl key to turn on/off the mic)
Both keys will be active.
 |
| * If [Show detail] is ON. |
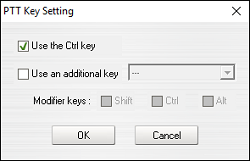
| Mark in window | Operation and function when click or selecting it |
|---|---|
| [Use The Ctrl key] | The Ctrl key is used as the audio key. |
| [Use an additional key] | The additional audio key can be used if indicated in the control box. |
| Modifier keys | This allows you to select the key or combination of keys for the audio control. Modifiers can also be used. |
| [OK] | The change in the setting is preserved, and the window is closed. |
| [Cancel] | This window is shut without preserving the change in the setting. |
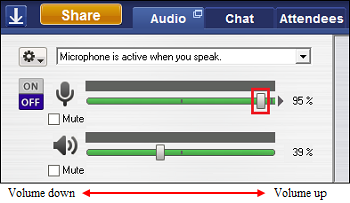
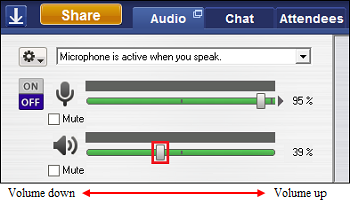
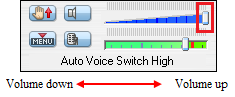
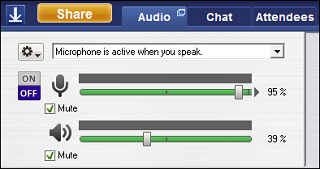
The mic volume is adjusted by use of the slide wire next to the mic icon.
Standard
Easy, Wide, Discussion, Seminar, V5standard, Classic
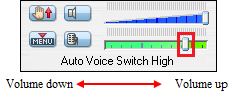
The volume of the speaker is adjusted by moving the slide indicator. The volume will increase by movement to the left and decrease by movement to the right.
Standard
Easy, Wide, Discussion, Seminar, V5standard, Classic
To mute the mic and the speakers click on the respective icons.
Standard
Easy, Wide, Discussion, Seminar, V5standard, Classic
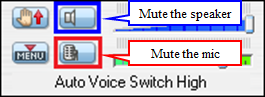
If you mute your microphone or speaker, you will see an elimination circle on the the appropriate icon, which demonstrates that the speaker or microphone is not active.
Standard
Easy, Wide, Discussion, Seminar, V5standard, Classic
There are three settings (standard, high-quality, highest quality) for audio quality in MeetingPlaza. However, it is not possible to change the quality during a conference. Voice quality is set:
(1) When you reserve the conference room with the conference scheduler7.
(2) When you make the conference room with Adhoc Login Tool 8.
Please refer to the manuals for details.
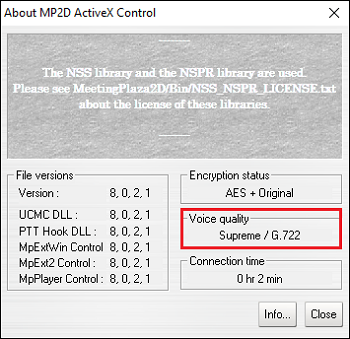
The voice quality of the present conference room is obtained by clicking "Version". The "Voice quality" is confirmed in the "About MP2D ActiveX Control" box.
| Standard | Wide, Discussion, Seminar, V5standard, Classic | Easy |
|---|---|---|
 |
 |
 |
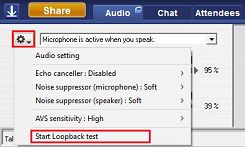
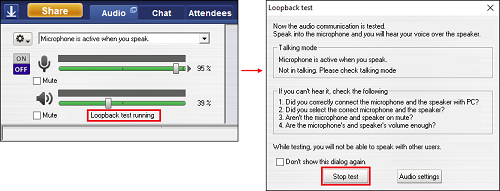
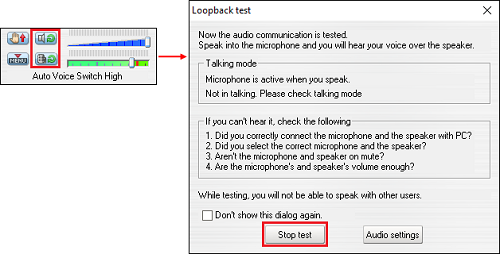
Users may confirm whether or not speaker or microphone is active in MeetingPlaza by using the loopback test prior to beginning the conference.
There are two ways to start the test tool.
Choose [Start Loopback test] to enable test tool. Talk into mic with the talk mode you enabled, your voice will loopback to the meeting room and you can hear it from your speaker.
After adjusting volume, click [stop test] in the loopback test screen to exit.
Standard
| To start an audio test from tab < Audio >. | To start an audio test from < Audio > Menu Button. |
|---|---|
|
|
 |
Easy, Discussion, Wide, Seminar, V5Standard, classic
| To start an audio test from tab < Audio >. | To start an audio test from < Audio > Menu Button. |
|---|---|
|
|
 |
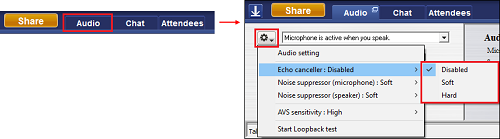
The use of an echo canceller allows the user to use an open mic without sending feedback to the conference participants.
This function is included in MeetingPlaza, and can be used if the CPU speed of the personal computer is 1GHz or more.
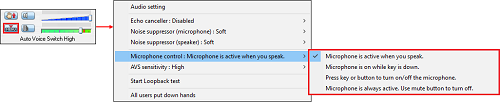
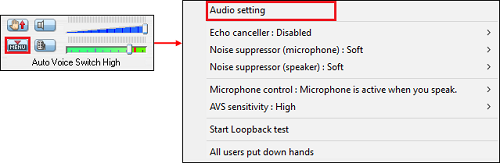
To set the echo cancelling function, click on the down arrow in the audio function box and select echo cancaller.
Standard
Easy, Wide, Discussion, Seminar, V5standard, Classic
The also recommend the use of a desktop mic with built in cancelling unction,
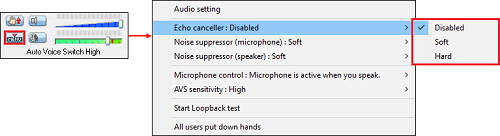
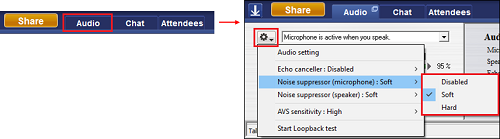
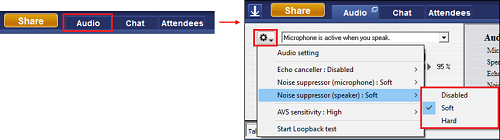
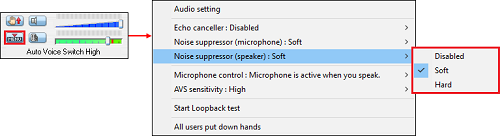
Noise reduction (microphone) can eliminate noise associated with microphone usage.
Standard
Easy, Wide, Discussion, Seminar, V5standard, Classic
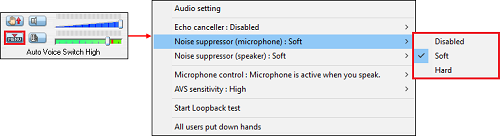
Noise reduction (speaker) can eliminate noise associated with speaker usage.
Standard
Easy, Wide, Discussion, Seminar, V5standard, Classic
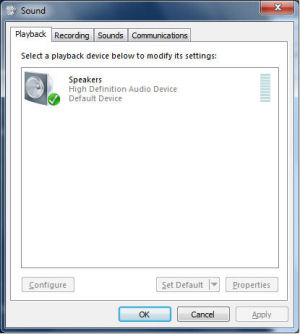
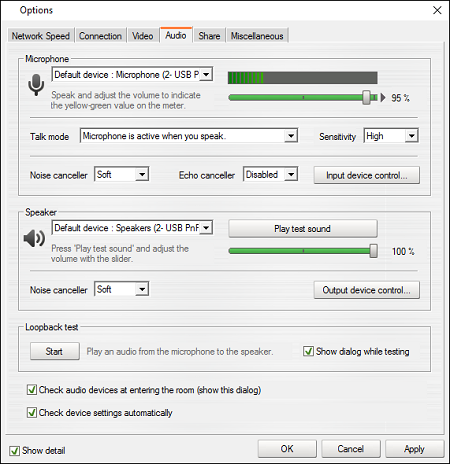
User adjusts mic volume and voice_16_02speaker volume in the meeting room at MeetingPlza. It also allows users to open Windows Control Panel (playback, recording) to make changes if a speaker problem occurs.
To make charges from Windows Control Panel, please go to [Sound] → [Manage audio devices] → tab [Sounds].
 |
| * If [Show detail] is ON. |

You can adjust the volume and "settings" of an Audio device (speaker or microphone), by using it in a MeetingPlaza conference room. You may also select your choice of devices in the "settings" menu and adjust your speaker and microphoe volumes.
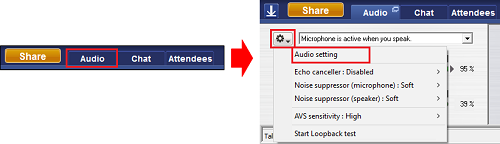
There are two procedures for opening the "audio settings"
| Standard | Wide, Discussion, Seminar, V5standard, Classic | Easy |
|---|---|---|
 |
 |
 |
The "settings" menu will open in either case above.
|
| * If [Show detail] is ON. |
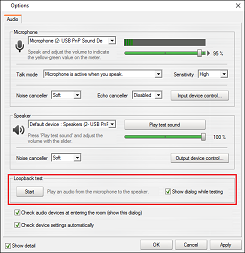
| Mark in window | Operation and function when click or selecting it | ||
|---|---|---|---|
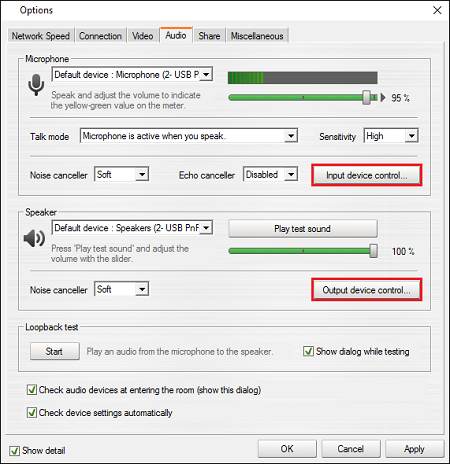
| List of [Mic] | It is a list of the mic device that the personal computer can uses. It will display all the mic devices that are available. | ||
| Green bar displayed [Mic] levels | Displays the mic sensitvity | ||
| [Mic] adjustment locator | Controls the sensitivity of the microphone. | ||
| List of [Microphone control] | The device for transmitting audio in the conference room is selected. Please refer to 5-1-1 for details of the audio function. | ||
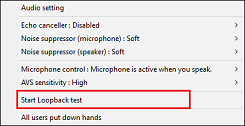
| [Sensitivity] list | You can choose how sensible you want the mic to detect sound when the voice switch mode is enabled. (Enable mic automatically while nobody is speaking). | ||
| [PTT key Settings] | The method for transmitting audio in the conference room is selected. Please refer to 5-1-2 for details of the utterance key. | ||
| List of mic [noise canceller] | Choose the strength of mic noise canceller. | ||
| List of mic [echo canceller] | Choose the strength of mic echo canceller. | ||
| Input Device Control | Open the Windows input device control. Please refer to 5-1-11 for details. | ||
| List of [Speaker] | It is a list of the speaker device that the computer supports. | ||
| [Sound test] | A very short melody sound is reproduced for confirmation. | ||
| Switch of [Speaker] | Adjusted the speaker volume | ||
| List of Speaker [noise canceller] | Choose strength of speaker noise canceller. | ||
| Output Device Control | Open the Windows output device control. Please refer to 5-1-11 for details. | ||
| [Start Loopback test] | Loopback test starts. | ||
| [Show dialog while loopback test] |
"Loopback test" When beginning, the window in the figure below is displayed.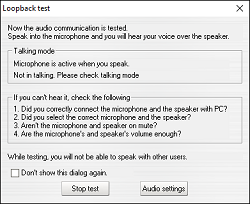
|
||
| Check audio device after login |
An audio setup page will be displayed at start screen per your setting.
| ||
| [Check device settings automatically] |
"Predetermined device" is checked by the automatic operation. It displays it in choices of the device of the mike and the speaker.
|
||
| [OK] | The settings are saved, and the window is closed. | ||
| [Cancel] | The setting is not saved, and the window is closed. | ||
| [Apply] | The setting is saved without shutting the window. |
The video specifications for MeetingPlaza:
The image transmitted and received is determined by the settings on the sending and receiving end.
The image sent is 320x256 it will be received as 320x256 even if the image that the camera transmits is 640x512.
The same limitations apply to the frame rate sent and received
The quality of the transmittion is dependent on the bandwidth available
In MeetingPlaza, the function to expand, to reduce the received image, and to display on the screen is provided. Therefore, if the size of the screen display is 80x64 even if the image that the other party took from the camera by size 640x512 is transmitted, and I also receive it by size 640x512, the reduction display is done as for the reception image. Oppositely, if the screen display size is set to 640x512 even if it is time when it also transmits, and received the image that the other party took from the camera by size 80x64 by size 80x64 also by me, the expansion display is done as for the reception image.
The video quality worsens because the display image is enlarged when the screen is displayed by a size that is bigger than the reception size.
The upper bound to make the image a high-resolution is decided by a set value at the network speed. When the network speed is fast, it is high of the image quality. The image can be sent and received. When the network speed is slow, only the image with low image quality can be sent and received.
The upper bound to make the image a high-resolution relates to the load of CPU of the personal computer.
When the load doesn't hang to CPU, the image with high image quality can be sent and received. However, when a high load hangs, only the image with low image quality can be sent and received.
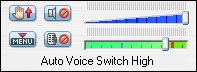
When "Image quality setting bar" on the left of the screen switch is raised up, it is a high-resolution (As for the frame rate, the sending and receiving size grows high according to the network speed), and a low image quality (The sending and receiving size becomes small a frame rate low according to the network speed) when lowering below.
The level of this bar is the one that "How do you allocate it in the image?" is specified among the set network speeds (band). Within the range at the set network speed (band), the quality of the image will be adjusted.
When "Audio Priority" is clicked, the switch is the bottom (lowest quality).
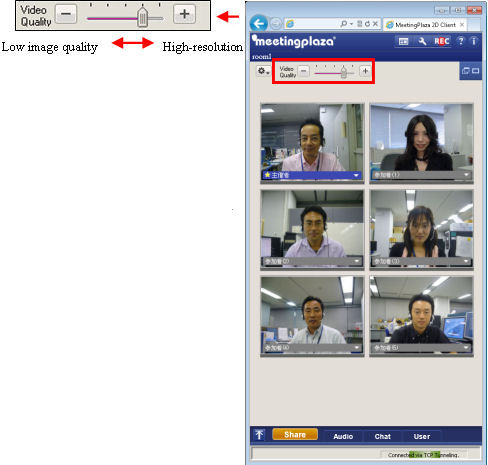
Adjust your settings without using the video quality bar.
| Standard | Wide, Discussion, Seminar, V5standard, Classic | Easy |
|---|---|---|
|
|
|
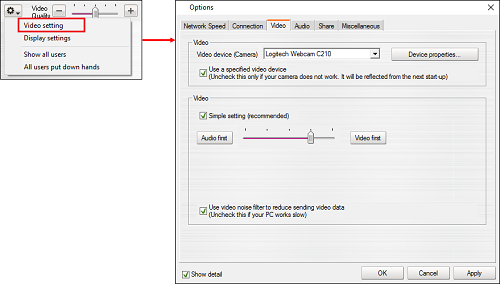
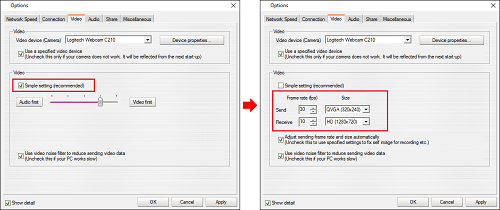
To set or adjust the video settings, select "settings", "video" check "simple settings" (Recommended) Box to clear the Frame Rate, size and video quality.
 |
| * If [Show detail] is ON. |
After adjusting the video settings to the desired levels, click < Apply > or < OK >.
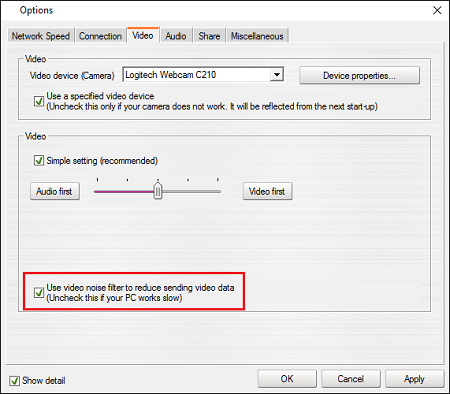
It improves the efficiency of source video data compression with no adverse effect on the visual quality, especially on video taken at low-end cameras.
 |
| * If [Show detail] is ON. |
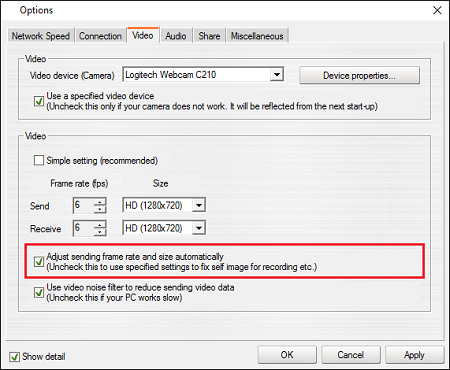
By turning OFF "Adjust sending frame rate and size automatically", video streaming transmission rates will vary per user's settings (frame rate, size).
By turning on "Adjust sending frame rate and size automatically", streaming video transmission rates will be automatically adjusted according to receiver's video settings to reduce channel bandwidth.
In general, please turn ON the checkbox.
 |
| * If [Show detail] is ON. |
(* Checking on "Simple Setting (recommended)" will promote "Adjust sending frame rate and size automatically" for video streaming services.)
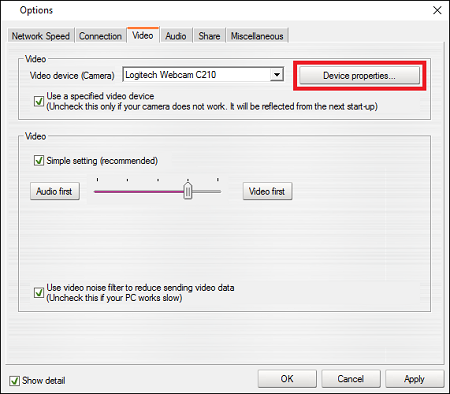
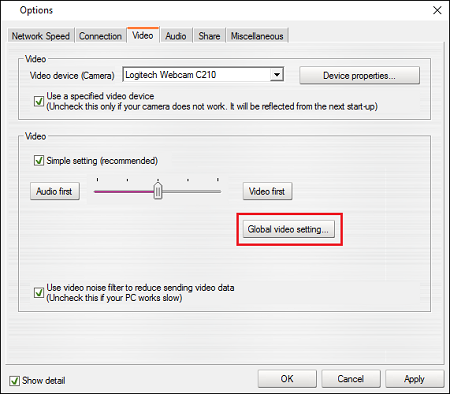
Users can check the properties of the selected camera device and change its settings.
Please change the settings if the camera image is blurred or flicker to improve image quality.
(Camera settings menus vary. Please contact your camera manufacturer for details on specific settings or requests.)
 |
| * If [Show detail] is ON. |
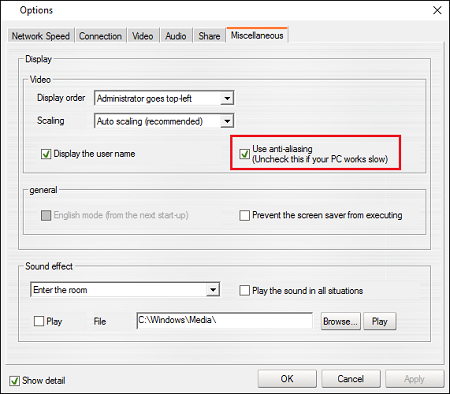
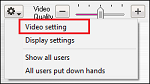
[Use a specified video device] (DirectShow) and [Use anti-aliasing] (DirectX) are both media-streaming architecture for Microsoft Windows.
By using [Use a specified video device], user is promised with a high-quality video playback of 10+ FPS from camera running on a high performance machine. To achieve this result, please make sure that your camera is compatible and DirectX 8 or later is installed on your computer.
In additional, by using [Use anti-aliasing] graphic API, video playbacks will become smoother and clearer. To achieve this result, please make sure that your computer (GPU) is compatible with DirectX.
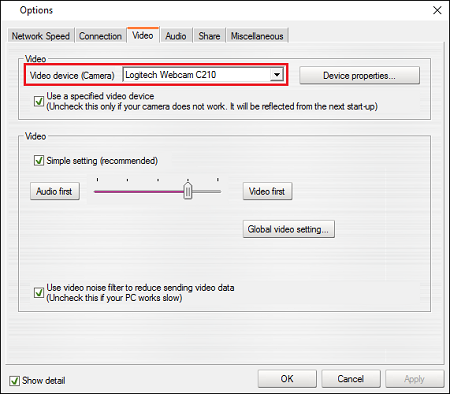
To set [Use a specified video device], please go to [Options] → tab [video]. [Use DirectShow if available] will be enabled if it's automatically detected. [Use anti-aliasing] is required to set manually.
 |
| * If [Show detail] is ON. |
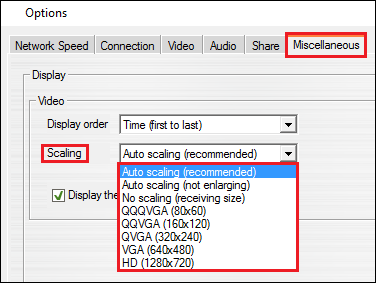
To set [Use anti-aliasing], go to [Options] → tab [Miscellaneous].
 |
| * If [Show detail] is ON. |
If two or more cameras are connected to the same PC, the selected camera can be set in the video tab under the settings button.
 |
| * If [Show detail] is ON. |
The picture below appears below all images in the layout.
The screen formats "Discussion", "Seminar"," V5Standard " will also appear at the bottom of the screen.
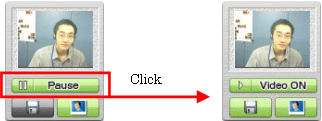
The video camera may be placed on "Pause" and the video image may be saved as a .bmp file and used in place of a live video image or feed. Selecting the "play" button will return the users live video stream.
| Button in window | Operation and function when click or selecting it |
|---|---|
 or or [Pause] |
The transmission of the camera image is stopped when clicking. The image of the button changes into  or or |
 or or [save] |
 or or |
 or or [still image] |
The bit map file is used instead of the camera image. The window where the bit map file is selected is displayed when clicking. |
The display size of the image is expanded and reduced automatically by the size of the window of the conference room screen (video area).
This expansion and reduction operation automatically done are standard of MeetingPlaza operation. To fix this function to a size that is off or specific, the following operation is done.
If it enlarges, twice it enlarges, and four times eight times are enlarged, the image quality might become bad according to the sending and receiving setting of my and other party's videos. (5-2-2)
A variety of display functions are provided besides the display function of the image that has been described up to now.
It explains these functions as follows.
The function concerning all participants' displays is shown as follows.

| Mark in window | Operation and function when click or selecting it |
|---|---|
| [Show all user] | It returns it to the state to display all participants by using this function when participant's display image is made non-display. |
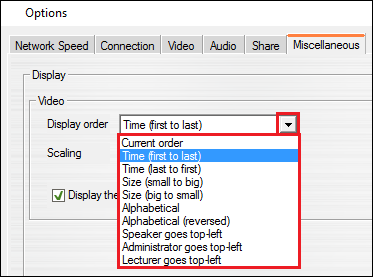
| [Display order] | The order of displaying the participant is specified. Alphabetical order (A -> Z) and alphabetical order (Z -> A) are arranged by participant's name (character-code). It is arranged by the character-code for Japanese. |
The function concerning the individual participant's display is shown as follows.
This function cannot be used on "Discussion" and "Seminar" screen.
| Mark in window | Operation and function when click or selecting it |
|---|---|
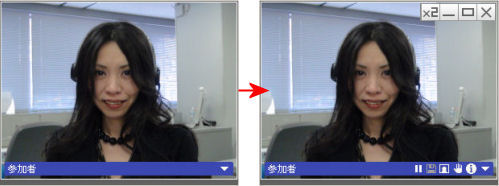
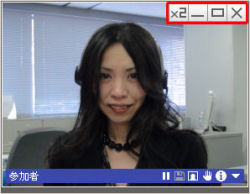
 Double size |
Will be displayed when the mouse is placed on or over the image. The image size will double when clicking on the X2 icon. Click the icon to return to original size. |
 Minimize |
Minimize the picture size of specified participants. To restore the minimized to original size, select the minimized user, and click < Return to original size> |
 Show only this user |
Only the selected participant's image displayed. While restoring to original size, Click  (Show all users) or choose <Show all users> in Video Setting menu. (Show all users) or choose <Show all users> in Video Setting menu.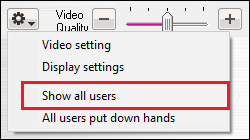
|
 Hide this user |
Only the selected participant is displayed on screen. The user may specify the display size. Replace the video settings by selecting "Show all users"
|
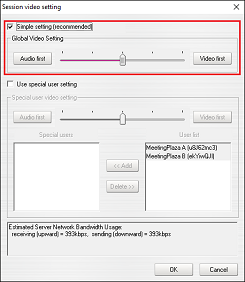
If you are entering a conference room as the organizer, you can change the video settings of other participants.
Select "Video settings on quality or "settings in other discussion modes and select Global video settings. This opens the preferences for adjusting the "Global Video settings".
| Standard | Wide, Discussion, Seminar, V5standard, Classic | Easy |
|---|---|---|
 |
 |
 |
 |
| * If [Show detail] is ON. |
 |
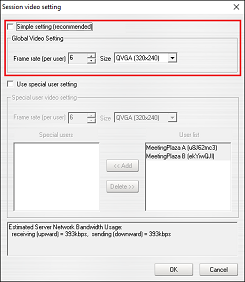 |
| Activating [Simple setting (recommended)] feature | Removing [Simple setting (recommended)] feature |
| Mark in window | Operation and function when click or selecting it |
|---|---|
| Simple setting (recommended) Check box | The batch video setting can be done by turning it on with an image quality setting bar. |
| [Video first] | Move the slider to the right by one tick. |
| Image quality slider | It is a low image quality (It is a sending and receiving size smallness of the network of the rate of the frame of low , according to the speed) when moving it to the high-resolution (It is a sending and receiving size size according to the frame rate amount and the network speed) and the left when the switch is moved to the right. |
| [Use special user setting] | An individual video setting can be done to each user who selects it by << Add by turning it on. |
| [ << Add ] | The user name moves in the frame of "User who applies" when the user name to which it wants to set an individual video is selected from the user name in the frame of "User who doesn't apply" and this button is clicked. |
| [ Delete >> ] | The user name moves in the frame of "User who doesn't apply" when the user name that an individual video setting doesn't target is selected from the user name in the frame of "User who applies" and this button is clicked. |
| Frame rate(per user) | The frame rate of the transmitted image is specified. As for the frame rate of the received image, the maximum reception frame rate corresponding to the network speed of each user is set automatically in each user. |
| Size | The size of the sent and received image is specified. |
| Quality | The image quality of the sent and received image is specified. |
| [OK] | The batch video setting is executed and the window is shut. |
| [Cancel] | The window is shut without executing the batch video setting. |
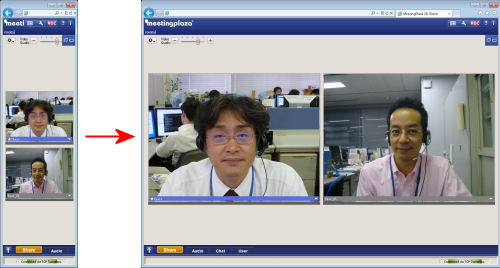
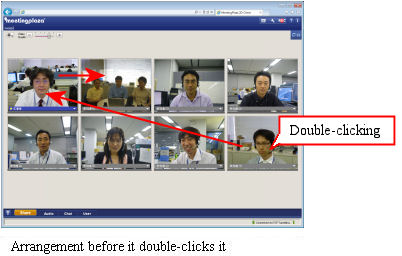
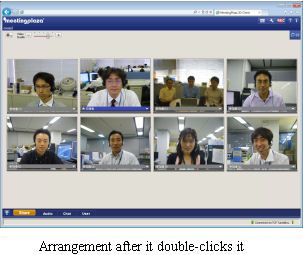
WWhen participant's image is double-clicked with the mouse, the participant's image can be moved on the left.
This function cannot be used on "Discussion" and "Seminar" screen. Moreover, it is not reflected that the display place changes only by the conference screen of me who operated it on other participants' conference screens.
The participant displayed on the left moves to just right.
The participant can be displayed in an arbitrary place by repeatedly executing this function.
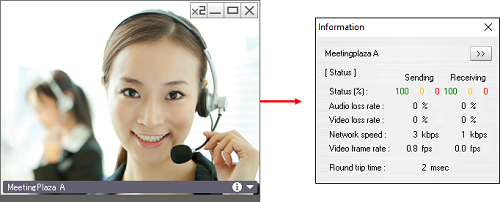
The participant's communication can be confirmed by moving the mouse cursor on the balloon type icon under the left of participant's image as shown in the figure below.
The transmission (reception): The figure of 100/0/0 is a color that shows the communication and value of %. A green, yellow, red ratio is shown from the left with %. Besides, it is a display.
While in a conference, participants can communicate with other participants of the group as a whole.
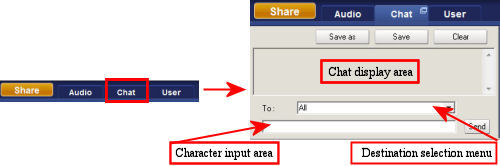
| Mark in window | Operation and function when click or selecting it |
|---|---|
| Character input area | Are for typing the message. |
| Destination selection menu | The part displayed as "All" under the character input area can select "All" (Transmit to all participants who are entering the same conference room) or an arbitrary participant name by the address of the chat character. |
| Chat display area | Running account of the chat for the conference |
| < Send > | The chat message is sent |
< Save as > |
The content of the chat displayed in the chat window can be saved to a named file. For chat in multiple languages, please check on <Save as UTF-8> to avoid messed up in characters. 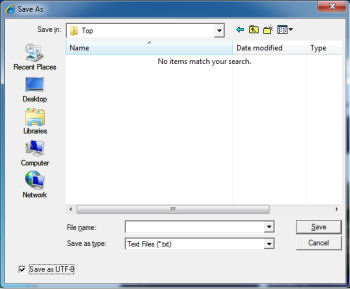
|
< Save as txt > |
The content of the chat displayed in the chat window is save to a text file. |
< clear > |
Clears the entire chat window |